
Shiplap Siding Installation
To make sure your shiplap siding installation goes as quickly and easily as possible, here are some general guidelines. Remember that these are guidelines only; you must consult your local building codes, or a professional siding installer in your area. Consulting your local building department, or HOA prior to starting exterior renovations to either a residential, or commercial building is a required step in any project. If you have any questions about these instructions, please give us a call.
- Apply a vapor barrier to the wall.
- Attach 3/4" furring strips over the vapor barrier every 16".
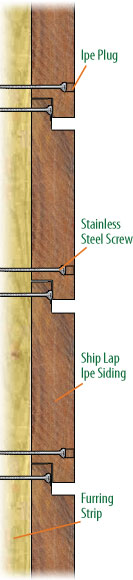
- Start at the bottom of the wall. To start the installation of a siding board pre-drill holes above each furring strip with a 1/8" drill bit. If Ipe Plugs are going to be used to conceal this initial fastener then a 3/8" drill bit should be used to make a hole for each Ipe Plug to fit into.
- Drive a 3" stainless steel screw through the 1/8" pre-drilled hole in the last step. This will secure the bottom half of each siding board.
- Next, with a 1/8" drill bit predrill a hole through the narrow part of the siding board that protrudes against the wall on the top of the board.
- Drive a 3" stainless steel screw through the 1/8" pre-drilled hole in the last step. There is no need to worry about plugging this hole as the next board that is installed will cover this fastener.
- Repeat the above steps for the rest of the siding boards up the wall.